Saturday, April 3, 2010
Malta Goya
Malta Goya is a carbonated, non-alcoholic, malt base beverage. It is just about as close to beer as you can get without actually being beer.
 Malta Goya has water, malted barley and hops, which by the original text of Reinheitsgebot, the 1516 German Purity law, is what you need to make beer. The missing ingredient in Malta Goya is yeast, and without yeast, there is no fermentation. Without fermentation we can't call this drink beer.
I stumbled upon four bottles of Malta Goya at the local dented can store. At a price of four for a dollar I was willing to risk the $.25 a bottle to try it out. It has a beautiful dark color and foamy off-white head. The aroma is distinct to any homebrewer; sweet wort. I was surprised at how good it tasted, most of the wort I try after I have brewed a batch is not very good; its just sickly sweet and harshly bitter. Malta Goya was very refreshing. It has a sweetness from the malt, but also other sugars behind it that help to balance the drink.
If I find more at the grocery store I'll probably buy them, even if it's only to give them to fellow beer drinkers and homebrews to try. If you interested in getting some of your own Malta Goya, check the ethnic food isle at your local supper market.
Hops Strainer
I try to limit the amount of hops floating freely in my boil kettle because it helps to keep my beer clearer when I transfer to the fermenter. In the past I've done this by individually bagging each hops addition in straining bags. While this works well for malty, low hop beers that only have two of three hop additions, it becomes a small amount of work for an IPA and an insane task for a Double IPA.

Tuesday, March 30, 2010
Carboy Etching
How much liquid is in your carboy? Sure the 5-gallon or 6-gallon level, depending on the size bottle you have, is pretty easy to hit, but what if I want to mix up a half batch of Star-San and need exactly 2.5 gallons?
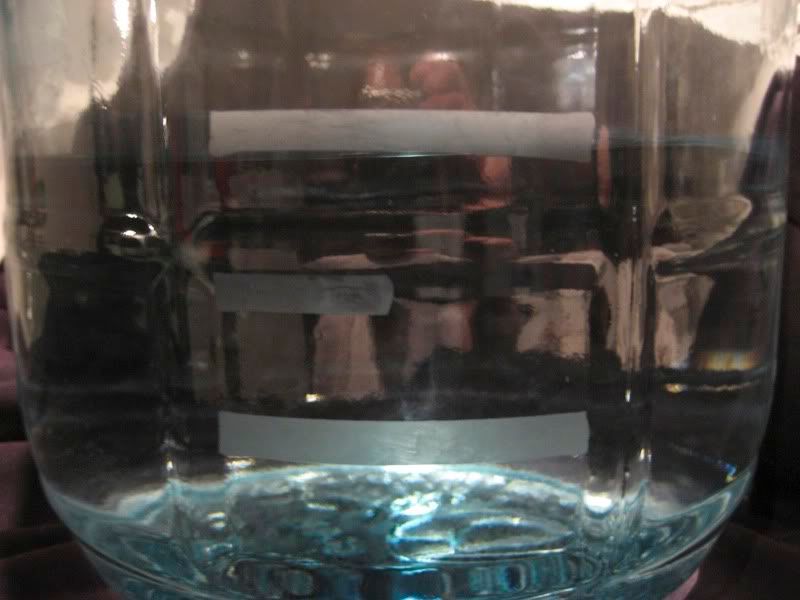
 Marker won't say, tape will peel off the first time I have to wash and a wooden measuring stick isn't sanitary and requires me to open the carboy. The solution to these problems is glass etching! I purchased a Deluxe Glass Etching kit from etchworld.com for $21.95 that I used, along with a bunch of masking tape to label my carboy with 1/2 gallon increments. The etchworld kit contained lots of items that I didn't need, like flower stencils, a pair of gloves, a small paint bush and razor blade. The item that I did use from the kit was the Armor Etch chemical.
Just tape off the area that you don't want etched by the Armor Etch chemical and paint a thick coat that will sit for a little more than a minute. Wash with warm water and remove the tape.

Just tape off the area that you don't want etched by the Armor Etch chemical and paint a thick coat that will sit for a little more than a minute. Wash with warm water and remove the tape.
Tuesday, March 16, 2010
Brew Pot Mod.
Today, with the help of another engineer from work I put a weldless fitting into my brew pot. I purchased the weldless fitting with high temp washers, a 1/2 inch barb fitting and a sanitary ball valve. The ball valve completely disassembles so that it can be cleaned and sanitized. I purchased the entire item at homebrewstuff.com for a good price. The part was shipped super fast and I got it right away. They even included a 10% off coupon for my next order, so I purchased some high temp hosing from them.

All the parts are 304 grade stainless steel and look great. I'm excited to brew this coming weekend and use this new valve to transfer the chilled wort from my boil kettle to my fermenter. No more lifting a heavy pot to pour into a carboy.

All the parts are 304 grade stainless steel and look great. I'm excited to brew this coming weekend and use this new valve to transfer the chilled wort from my boil kettle to my fermenter. No more lifting a heavy pot to pour into a carboy.
Sunday, March 14, 2010
...not by beer alone
Man can not live by beer alone, try as we may, there are many other things that deserve our attention. In what I hope to make a regular feature for School Master, "...not by beer alone", we will take a look at things outside of brewing.

This is our first attempt at wine, "Conrad Concord", named after the local 18th century Iroquois translator and frontiersman, Conrad Weiser, is seen here next to a carboy of "The BN Session Brown", English Brown Ale. It is quite different making wine; no grains, no boil, gravity readings above 1.100!
We started with 30.0 lbs of Concord grapes picked from a relatives arbor and frozen until we made time to make the wine.
A must was started with...
Again, there are some serious differences between making beer and wine. Wine does not involve a boil, so spoiling bacteria, wild yeasts and other "nasties" are removed by adding sulfur-based compounds to wine. When transferring the wine from the primary fermenter to the carboy we put the grape skins in a sanitized mesh bad and squeezed it with our bare hands. Granted I washed liked the dickens; trimming my fingernails, scrubbing my hands and arms and then submersing my my arms in star-san. but the process was a little odd.
The wine tastes good thus far and I am looking forward to finishing this batch and making many more.

This is our first attempt at wine, "Conrad Concord", named after the local 18th century Iroquois translator and frontiersman, Conrad Weiser, is seen here next to a carboy of "The BN Session Brown", English Brown Ale. It is quite different making wine; no grains, no boil, gravity readings above 1.100!
We started with 30.0 lbs of Concord grapes picked from a relatives arbor and frozen until we made time to make the wine.
A must was started with...
- 5 crushed campden tables (sodium metabisulfite (Na2S2O5))
- 30 lbs crushed Concord grapes
- 2 gallons water
- 10 lbs sugar
- 5 tsp yeast nutrient
- 2-1/2 tsp pectic enzyme
- 2 packets wine yeast
Again, there are some serious differences between making beer and wine. Wine does not involve a boil, so spoiling bacteria, wild yeasts and other "nasties" are removed by adding sulfur-based compounds to wine. When transferring the wine from the primary fermenter to the carboy we put the grape skins in a sanitized mesh bad and squeezed it with our bare hands. Granted I washed liked the dickens; trimming my fingernails, scrubbing my hands and arms and then submersing my my arms in star-san. but the process was a little odd.
The wine tastes good thus far and I am looking forward to finishing this batch and making many more.
Tuesday, February 23, 2010
Brew Pot Mod.
I've heard many times that the two most important things in brewing are consistency and sanitization. In the spirit of the latter I've modified my brew pot. Previously, the lid of my brew pot sat askew in order to accommodate my immersion chiller.


With a little work in my company's machine shop (band-saw and some files, followed by Emory cloth) I've got a perfect fit for the brew pot lid with my immersion chiller.
This should help to keep any "nasties" out of the brew during chilling.

Well, no more my friends, no more.

With a little work in my company's machine shop (band-saw and some files, followed by Emory cloth) I've got a perfect fit for the brew pot lid with my immersion chiller.
This should help to keep any "nasties" out of the brew during chilling.
Monday, February 22, 2010
Berks County Homebrew Club
The Berks County Homebrew Club had its first meeting on Tuesday, January 12th 2010 at Canal St. Pub. A club, "dedicated to the world of home brewing," drew a crowd of more than a dozen local home brewers and beer lovers.
After seeing the label designs of School Master Brewing Co. the group asked for a logo design. Happy to help, the above pictured logo was created and approved as the group's official graphic.
You can find out more about the Berks County Homebrew Club by emailing berkshomebrew@gmail.com or following them on Facebook; name Berks Homebrew.
Sunday, January 17, 2010
Nut Brown Ale

I used a Brewers Best bold series kit to make what will be called "Buck Fever Brown".
6.6 lb - Amber LME 3.0 lb - Amber DME 4 oz - Crystal malt 4 oz - Chocolate malt 1 oz - Black Patent malt 1 oz - Willamette hops (bittering) 1 oz - Willamette hops (flavoring) 1 oz - Columbus hops (aroma)

Thursday, January 7, 2010
Beer Gift


Subscribe to:
Posts (Atom)